How is the app? Check it out!
Delivery Date Document
APP CONFIGURE TUTORIAL
————————————————————————————————
- Updated: 10/07/2019
- By: Omegatheme.com
- Email: contact@omegatheme.com
This is a documentation of Delivery Date App app, which helps you to install and configure your app in the right way.
❗️Note: There have been some changes made in our app settings recently, so we suggest not only new installer but also current user read this document thoroughly, as it will help you understand some new features and new interface.
How to set up Delivery Date app
⭐️ Install app:
Link install app: https://apps.shopify.com/delivery-date-omega
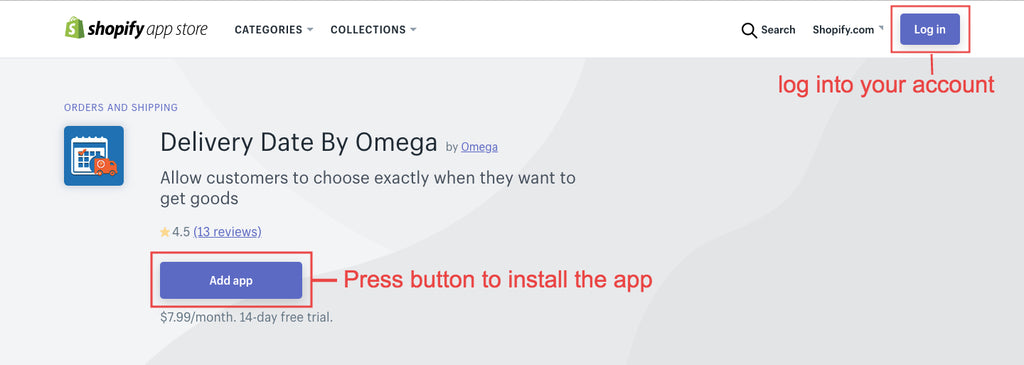
Step 1: Log in your Shopify account in App Store. Click ADD APP to install the app.
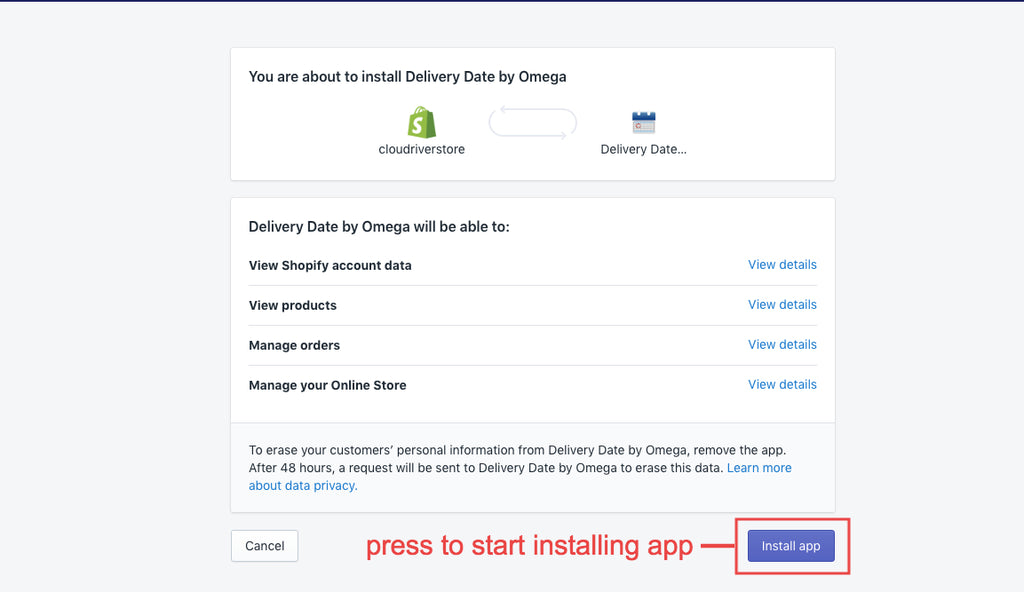
Step 2: You will then be redirected to your admin page to make a payment for the app and start installing.
Step 3: After Installing app, it will be ready to use in Apps section.
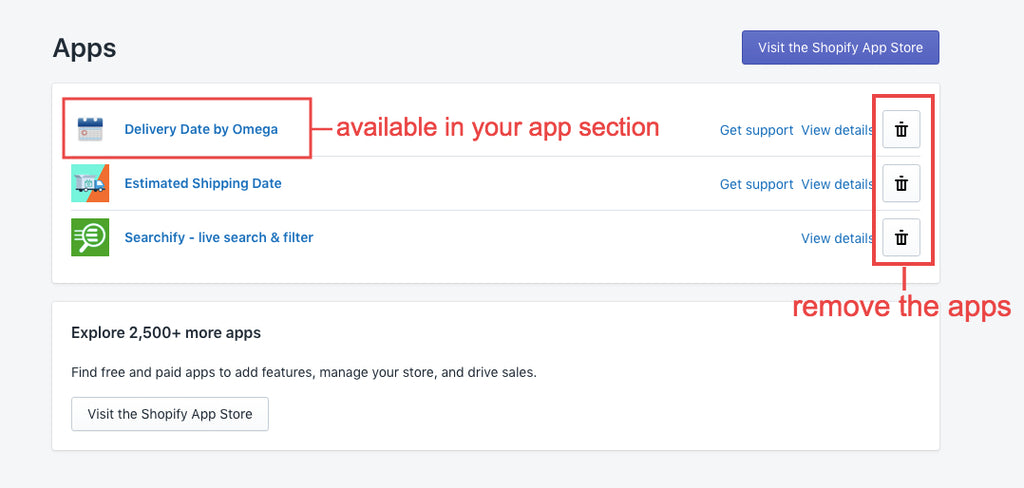
Note: If you have finished installing but the app does not show up in Apps section or the automatic installation is failed, please contact us immediately at contact@omegatheme.com to seek help ASAP.
⭐️ How to set up the app?
After installing Delivery Date app you be redirected to General Setting tab:

- You can enable or disable app by switching the Enable slider in the App section.
- Display Settings and Custom Rules are for displaying your delivery date information. The chosen panel can be configured in the next tab.
- Display Setting will help you set your date format and display information
- Custom Rules will custom delivery rules for some special products.
1. GENERAL SETTING
⭐️Date Setting Section
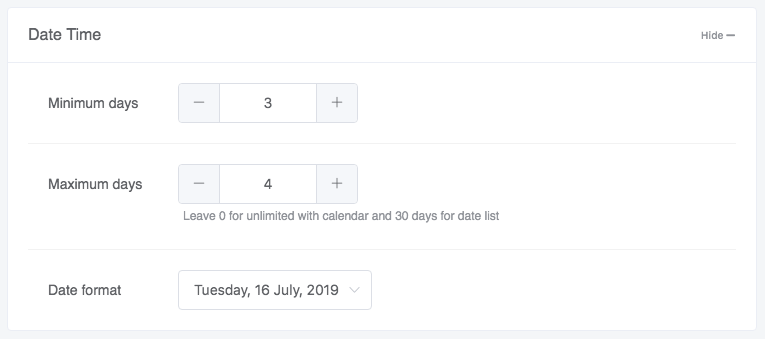
- Minimum days indicate the number of days you need to prepare the goods and be ready to ship.
- Maximum days indicate the number of days it takes to ship the goods from warehouse to your customers.
- You can also choose a Date format that you want to show in the format section, this date format also appears at the tag section on Shopify order.
⭐️Time Slot:
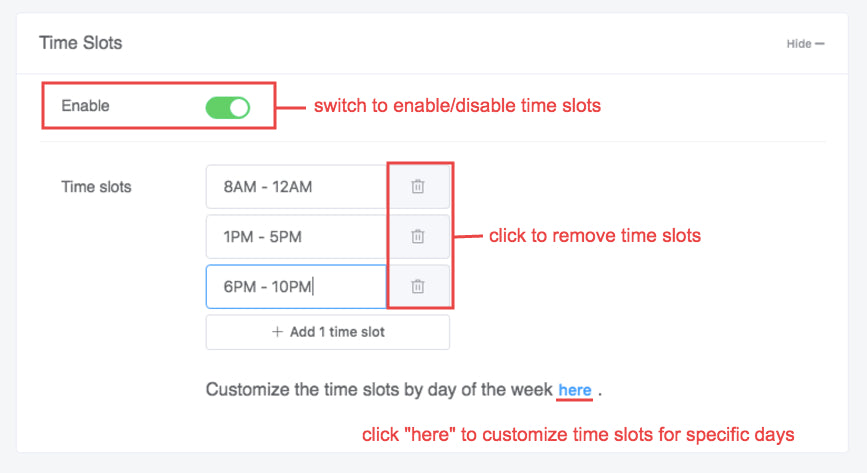
- There’s a significant change in the usage of the Time Slots section compared to the older version. You can set the delivery date in the Time Slots section. You can change the time, add or delete it easily.
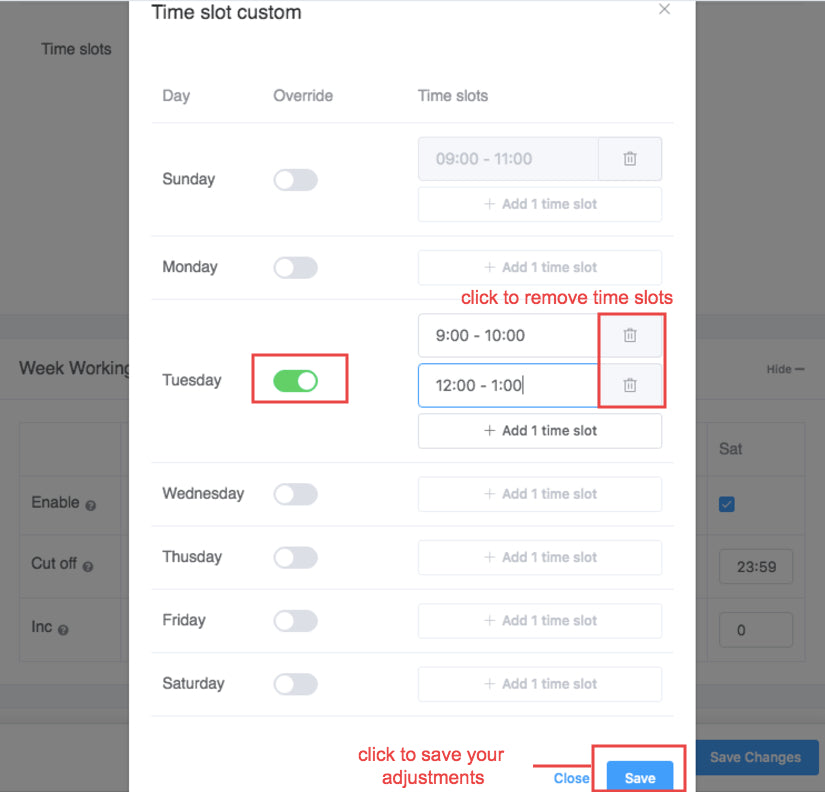
- Our updated feature provides customization time slots for each day of the week. You can choose whatever day you want to add time slots by enable Override.
⭐️Week Working Day
- Under this section, you can configure the general information such as day off, closing time, etc..

- We suggest to set Minimum days first because it will be easier to calculate for you.
- Cut-off time means the time you want to stop receiving orders on the enabling day.
- Inc means the number of day to deliver your products after Cut-off time and will be counted with the Minimum days.
- Specific Inc is used when you want to increase the days your customers order after cut-off time. And it only be needed when you disable the day.
- Minimum days are the days counted from Today to Delivery Day. Whereas Maximum days are the period of time you want your customers to choose from Start Date to End Date.
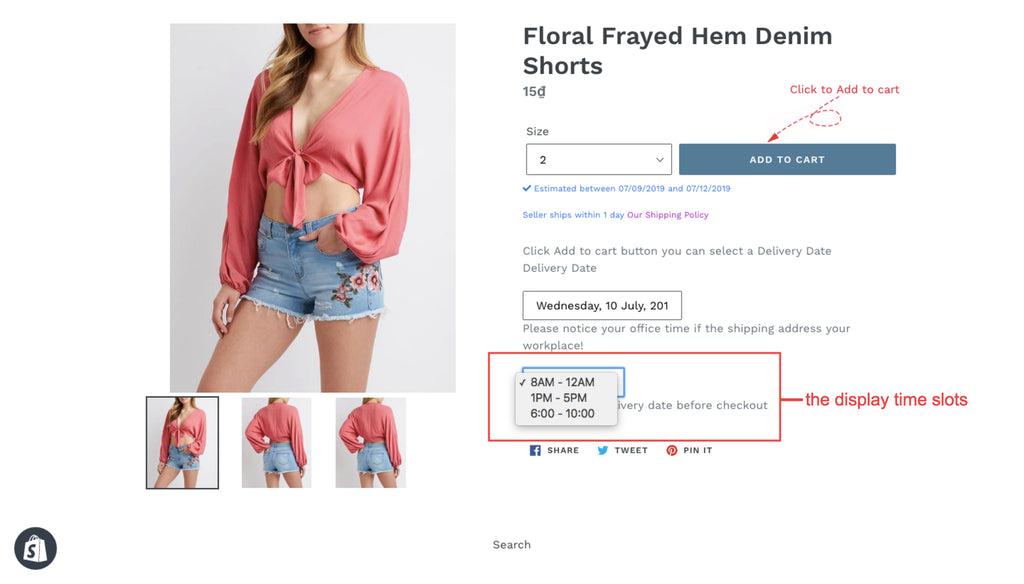
- The Inc day automatically adds X more day after cut-off time. Below is an example of how your setting is going to show on the product page if you set Inc 1:
Before cut-off time:

⭐️Limit delivery by orders
- Enable this option to limit the quantity of orders per day.

⭐️Same Day Delivery:
- Enable this option if you want to set different timeslots during a specific of time. Please note that it will not automatically show same-day delivery, make sure that your minimum days is 0 if you customer choose delivery at the same day as order day.

- Enable before: set the time to show time slots for orders before a specific time
- Time slots: Set up different time slots for this day, until the enable time set above.
⭐️Holidays:
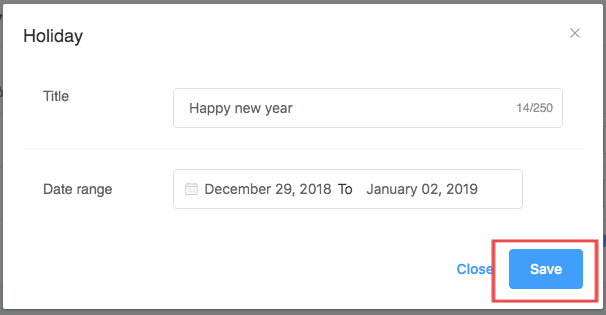
- Click New holiday to set dates you do not deliver under Holidays tab. Selected holidays will be disabled in the delivery calendar on the cart page. Below is an example
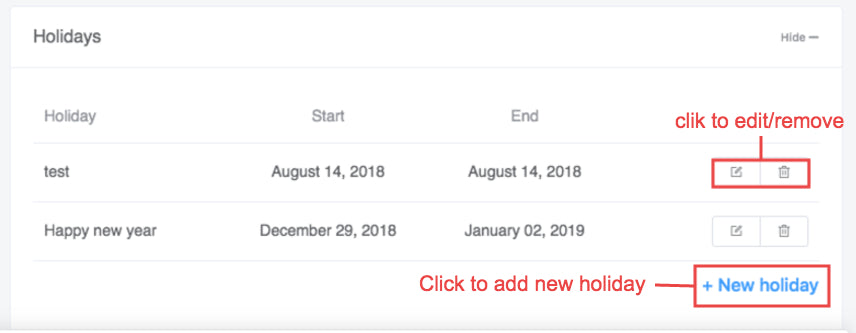
- You can edit a Holiday to change the holiday title and date range, and then click Save to finish:
2. DISPLAY SETTINGS
- Move on to the next tab, Display Settings to set the delivery date field on the cart page.
⭐️Date Input
- Under the Date Input section, you can set the required delivery date that your customers have to choose before checking out. When you disable, it will allow your customer to checkout without choosing a delivery date.
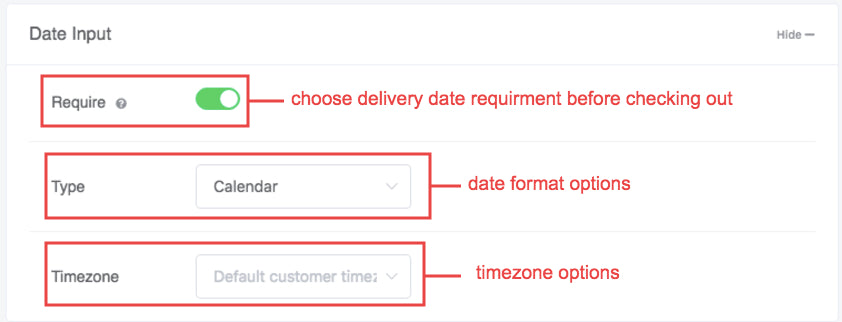
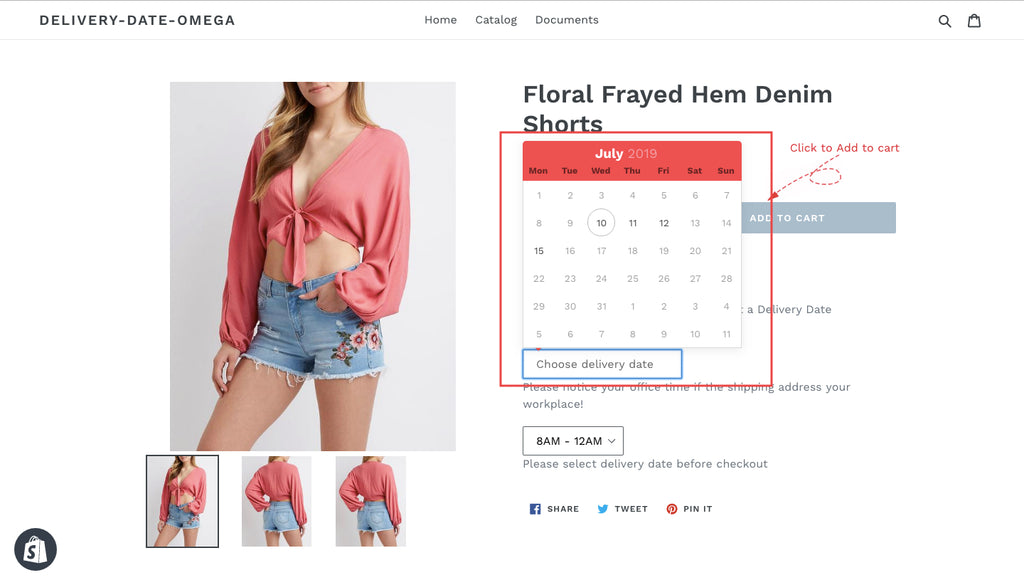
- Choose the format of calendar to show on the checkout page, either “Calendar” or “Date list”. For instance, when you choose “Calendar”, the date format will be displaying like this:
- Timezone: is the section that you can choose to pick the time and display calendar. You can either choose "Default customer timezone" or your timezone.
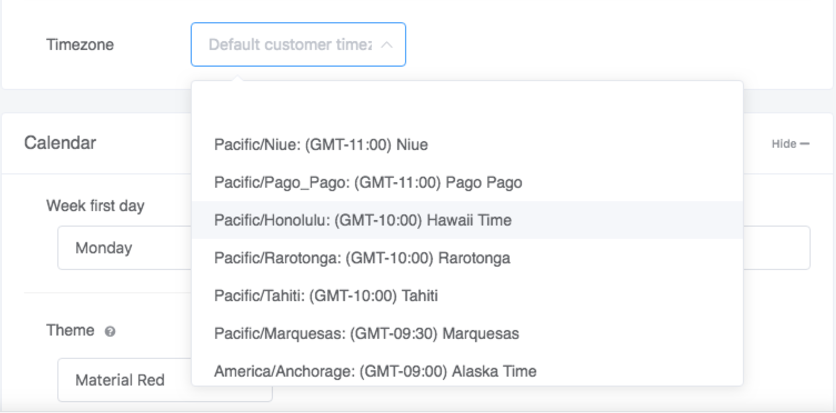
- Default customer timezone means that the calendar displayed at the cart page will be based on the customer's time. It is suitable for merchants who sell cross countries and can work 24/24.
- When you choose a single timezone, our app will base on that and convert time to show calendar to customers.
⭐️Calendar
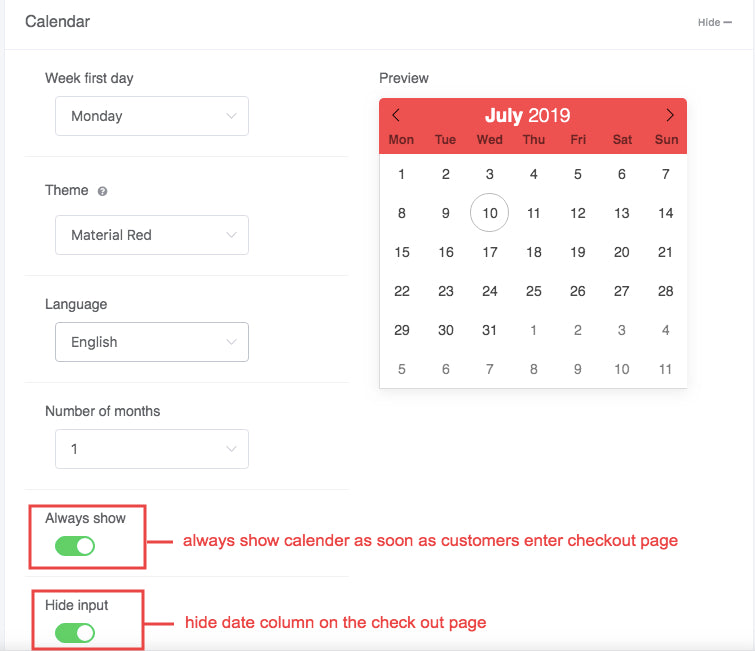
- Under this section, adjust your calendar outlook that suits your preference. It's simple to customize the calendar theme, languages, color scheme.
-
Always show and Hide input affect the delivery date that is displaying on your store. Specifically, when activate Always show, the calendar will display as soon as when someone enters the product page. When the Hide input button is switched on, the date column is not going to show on your store.
⭐️Display Position
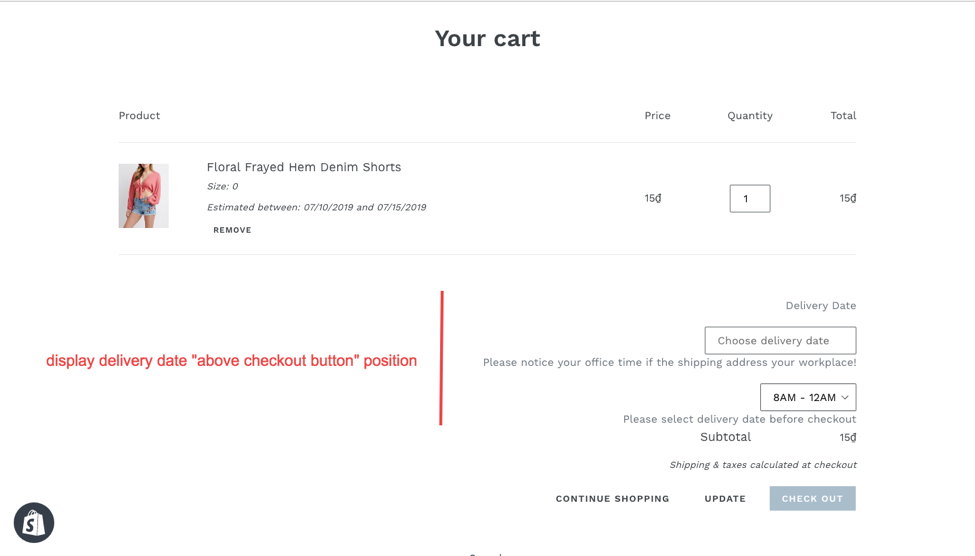
- Display Position offers you 2 options on the cart page where you can choose either above or below checkout button. As you can see from the example below, that is how your cart page will display on your store if you choose “above checkout button”.
⭐️Text
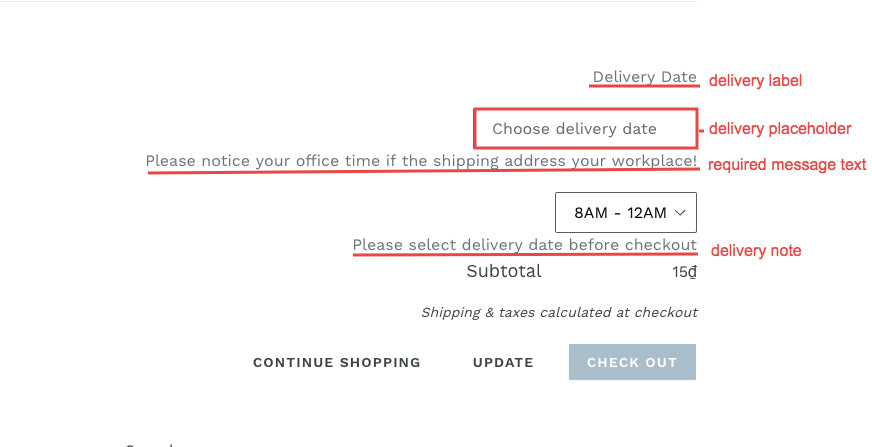
- If you want to customize the message associates with each of the field on your cart page, please edit the information in the Text section:
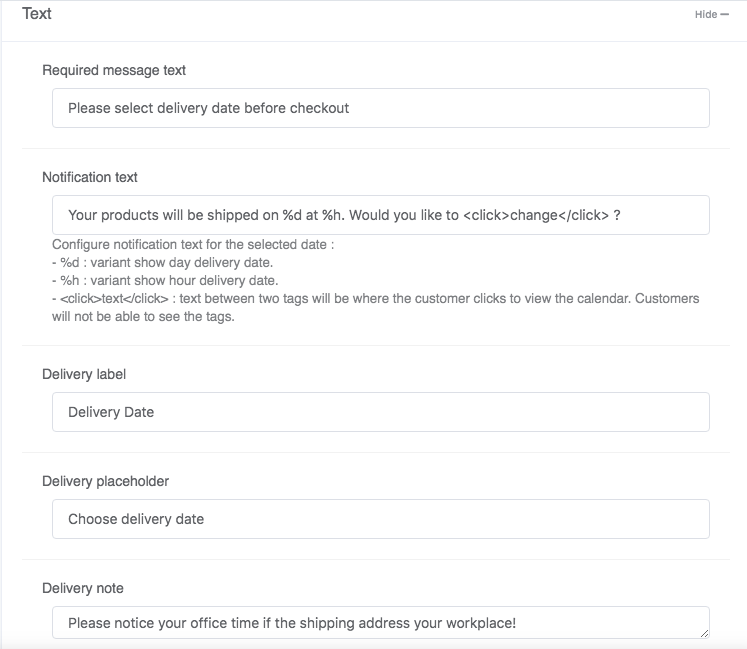
- The Notification Text will be shown when your customers enters the checkout page but then back to the cart page. The purpose is letting your customers to change the delivery date if they are uncertain.
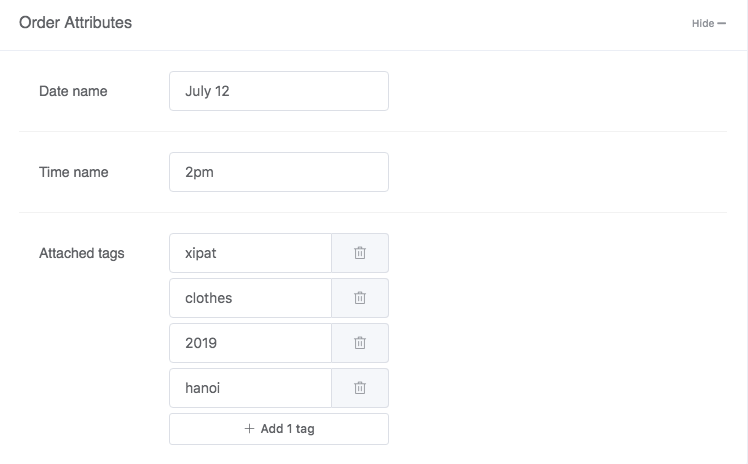
⭐️Order attributes
These features are invisible to your customers, but it is easier for you to find your products in the Product or Order sections in your Shopify admin.
⭐️Advance
- You can custom your store by using the Advance section. However, CSS3 knowledge is required to do so.
- Applying CSS3 to the interface helps the website run faster, because there are many layout templates that you can use CSS to design instead of using the background that takes a lot of resources to store and download.
Here's an example of a customized coding text

3. Custom Rules
⭐️Collections
- Under the Collections, you can apply rules for specific collections:

- After clicking New collection, a tab will appear to set the rule for collection selected:

- Please note that you can not add a new collection to set the rule on our app. The list of available collections can be found and edited in your Shopify admin
- Each collection's rule can be edited or deleted, click Save afterwards.
⭐️Disable app on collections
- You can disable the display of the app for specific collections, however, please remember that the app on the cart page and product page where contains products in those collections will also not work.

⭐️Products
- In the Products, you can apply rules for specific products:
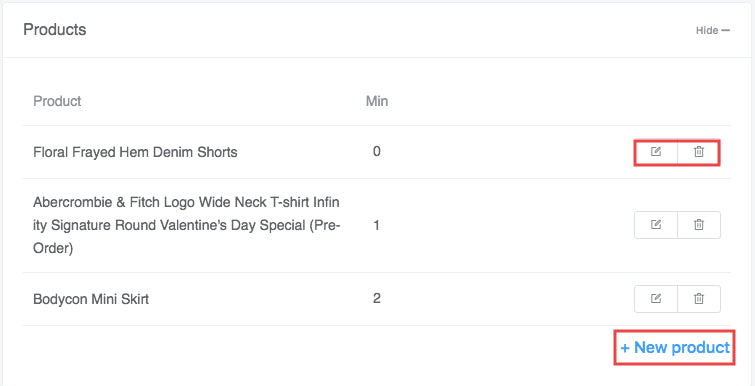
- As you click New Product, this tab will show up:
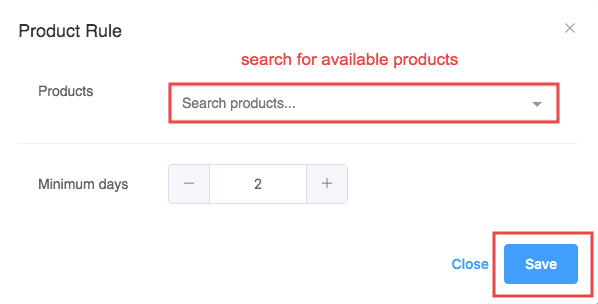
- Please note that you can not add a new product for shipment in our app. The list of available products can be found and edited in Products section in your Shopify admin.
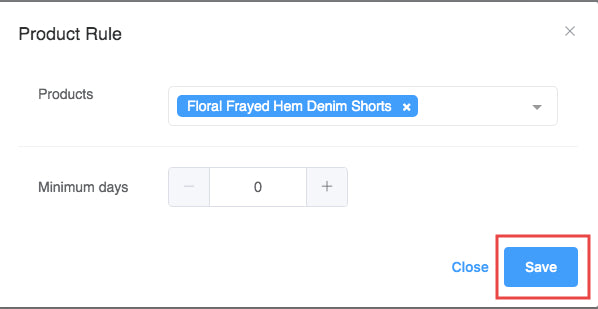
- You can edit a rule by clicking on where to change the product and its minimum days. Click Save afterwards.
⭐️Display settings for custom products
- Display settings for custom products determines what will be displayed for the products you have customized.
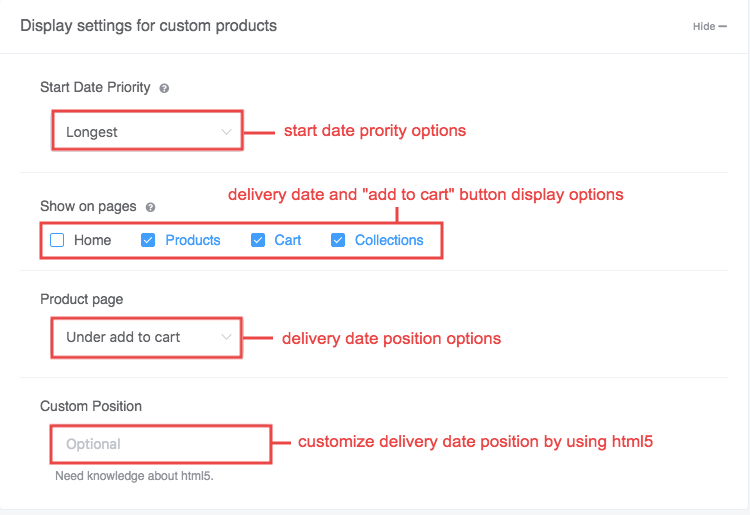
- Start Date Priority:
This option will be used when you add custom rules for product/ collections and your customers add multiple products with different rule, at that time, the priority rule will be applied to show the proper calendar.
You can choose one out of the two default options, Longest or Shortest. This means the delivery date is basically based on the minimum days of the product.
Shortest: the shortest duration from start date to end date showing on calendar
Longest: the longest duration from start date to end date showing on calendar.
- Show on pages:
There are 4 options for you to show the calendar:

Home page: to show the calendar on home page, you need to add the code <div class="ot-delivery-date-page"></div> at place you would like to show on home page.
On homepage, the calendar will show with the rule on general settings
Product page: to show the calendar on product page, you just need to add the rule for product. The calendar will show with the custom rule you set for this product.
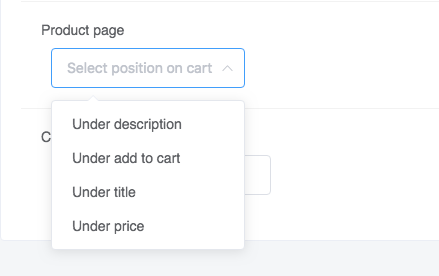
There is an option for you to custom calendar position on product page:
Here is the example of how “under title” option will be shown on the checkout page:
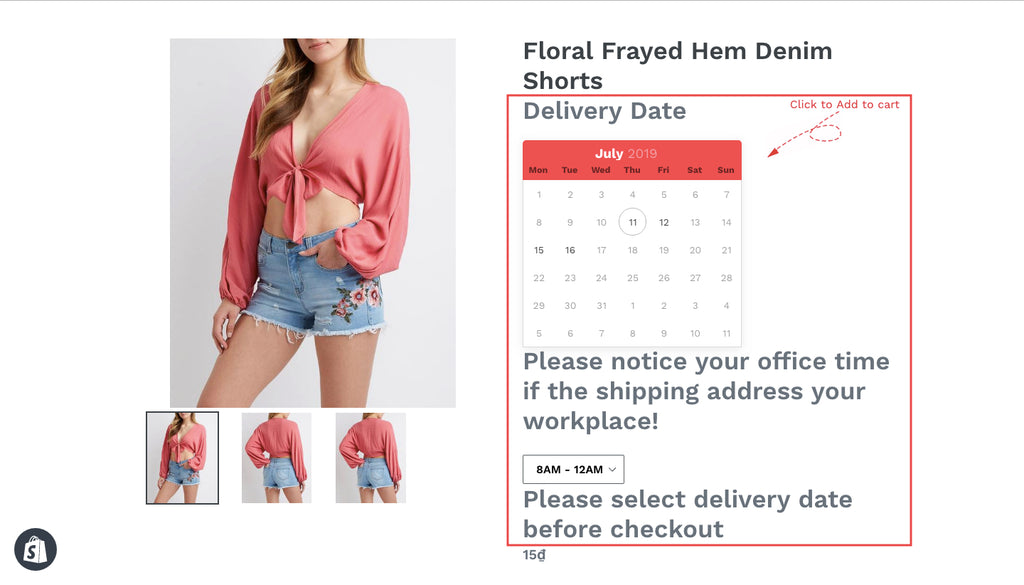
There are 4 choices for delivery date positions: Under Add to cart, Under product, Under price, Under title. But if you are not satisfied with the default selections, you can customize it by adding codes to the blank Custom Positions we made solely for this purpose. However, this method requires knowledge about advanced coding, therefore we recommend you contact us at contact@omegatheme.com for support.
Cart page: this option should always be checked.
The calendar will show the general settings if you don't have any custom rules. If you set up custom rules, it will base on start date priority to show calendar.
Collection page: to show the calendar on collection page, you need to add the code <div class="ot-delivery-date-page"></div> at place you would like to show on collection page.
On collection page, the calendar will show with the rule on general settings
4. Delivery date order
- In this tab, you can sort all orders based on order, date of order, customer or fulfillment status for a better product management and delivery time.

5. Calendar
In this part, you will be able to see how many orders you have in a day and the delivery time by a calendar or list view.


✏️ Noted:
- Selected delivery date will be displayed on the Additional Details Order page in admin dashboard.
- Free and Fast Support: Our technical support will help you solve any problems within 24 hours (on working days).
6. Store Pickup
Location Settings section
After enabling the Store Pickup option, let's move to the Location Settings section and start working on it!
Here you will see the Add New Location button, click there to add a new store location.

Below is the information that you need to fill in to add a new store location.
Minimum days: Indicate the number of days you need to prepare the goods and be ready for pick up
Maximum days: The range of days available on the calendar for pick up
Also, you can set the time slot available of your offline store by enable this option

Then scroll down to the Week working day table
You can do the same with settings for delivery in General settings layout; set the week days available for pickup and your cut-off time if you want. Then do not forget to save all the changes before leaving

Display Settings section
Text settings
You can easily set up the text display on your front store with some quick settings

Color Settings
Now you can customize the color of the widget to match your store’s pantone. Especially, you can see the real time changes without checking on your front store one by one

Enable Google Map

Finally, you can add a Google Map API key to show the map so that your customers can see exactly where your store is and find the nearest store to pick their item up. Do not forget to save all your new changes then
Here is how the app display on your front store with pickup option

7. FAQs❓
- Does App support IOS or Android ?
Yes, we support all device including mobile.
- How to add code to the Order Confirmation Email?
1. Copy this code below
<h4>Additional details</h4>
<p>
{% for attribute in attributes %}
{{ attribute | first }}: {{ attribute | last }}<br>
{% endfor %}
</p>
2. Go to Settings and paste the code above to your confirmation email like below


- Does the app need additional source code?
No, The app is used right away.
- Do I have to pay for this app again when I reinstall it?
Unfortunately, yes. When you uninstalled the app, your monthly subscription was cancelled so Shopify will ask you to accept again the recurring charge associated to the app subscription. This happens even if you uninstalled the app one minute ago because your recurring charge was cancelled.
Please note that payments are managed directly by Shopify. It is Shopify, not us, who charges you, and then transfers our part to us.
- How does the trial system work?
When you install our app for the first time, you can use it free of charge in a period of time (the trial period). The trial period only available once for each store. If the trial period were available every time the app is installed, a store could uninstall and reinstall the app many times to use the app for free forever.
Our Delivery Date app has a trial period of 14 days. You can re-install the app as many times as you want within those 14 days and you will not be charged.
If you don't want to be charged when the trial period expires, you have to uninstall the app before that date. But if you uninstall the app and install it again after the trial period, you will be charged immediately.
- Can i get a trial extension?
We use the standard Shopify trial system that is not prepared to deal with trial extensions and we consider that our trial period gives stores enough time to test the app capabilities and see if the app is a good fit for their store. So we are sorry to say that there's no easy way to extend your trial.
-

This occurs because your browser can not support the older version. Please make sure your browser is the same or in a higher version compare to the browser listed above.
If you have any problem in using Delivery Date please do not hesitate to contact us at contact@omegatheme.com, our support team will make sure your problem is solved as soon as possible.
